Following extensive researching, testing and talking to Dreamhost’s Support team it transpires that their set-up of XCache conflicts with W3 Total Cache (W3TC) for WordPress.
I can also confirm from an IM conversation with a member of their support team that although Memcached is installed and enabled on their VPS environments, they do NOT run it. This is reserved only for Dedicated hosting packages.
Dreamhost Hosting Environment
- Dreamhost VPS with 1GB RAM for hosting the WordPress install
- Apache web server
- PHP 5.6 FastCGI
- memory_limit = 128M
- Dreamhost Database VPS with 300MB RAM (separate VPS to the one hosting WordPress)
Test Process
- Performance testing was measured using a combination of Network performance via Chrome’s inspect element and Apache Benchmark.
- Chrome Incognito was used, making sure to reload the browser window using Ctrl + F5 to do a full browser cache clear.
- phpinfo.php was used to make sure Opcahe was enabled. The VPS environemnt was also restarted after Opcache was enabled.
- Each test was be performed 3 times, with only the average figure being used in the summary results graph. This is to allow for the usual variation that comes from testing web technologies.
- As I go through each step of the test, I am adding each enhancement so the end is the cumulative effects of all the changes.
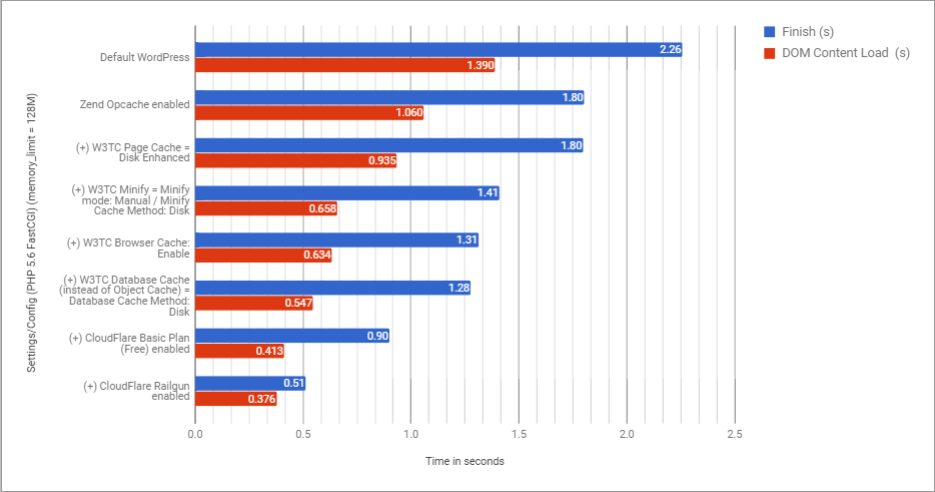
Summary Results Graph
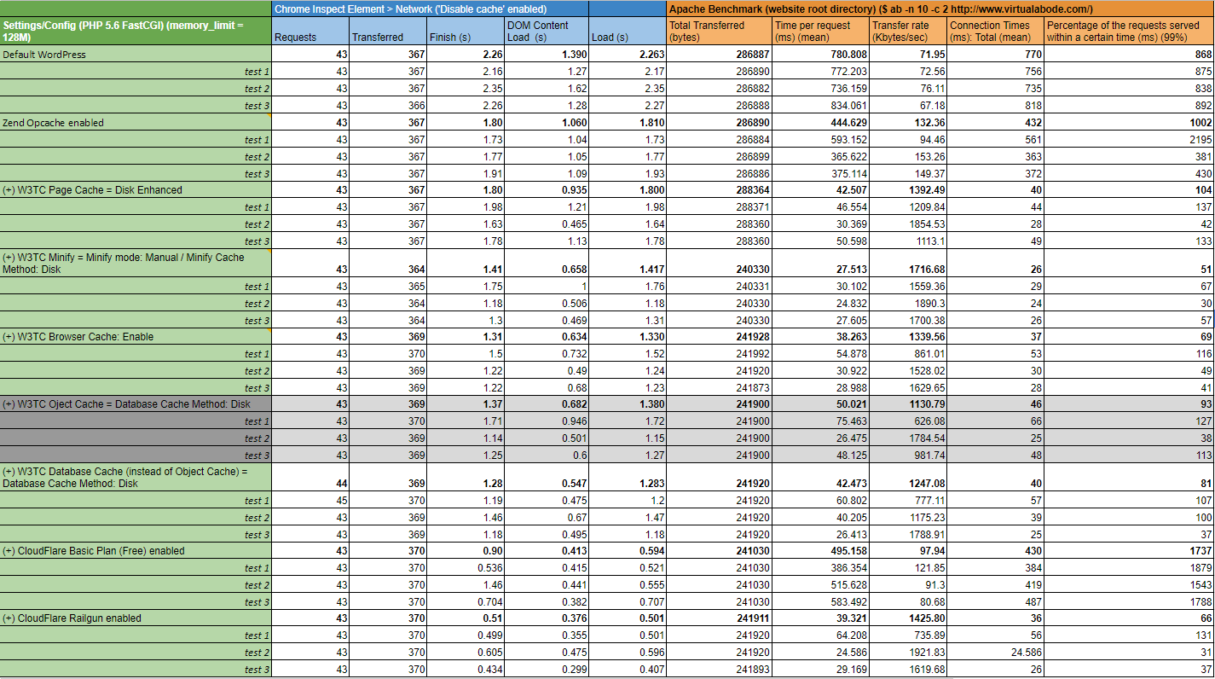
Detailed Results Data
For the detailed data results see Google spreadsheet https://docs.google.com/spreadsheets/d/1MqtRClOBlnyCIR1bE1qY-SAPeGIu2xP1r_eUeVU1UxM/
Optimum Setting
The optimum settings that I discovered through this lengthy process of communications with Dreamhost, supplemented by detailed testing of W3TC setting variations with Network performance via Chrome’s inspect element and Apache Benchmark is:
- Enable Zend Opcache – which you can do easily by updating you php.ini/phprc file (Dreamhost guidelines https://help.dreamhost.com/hc/en-us/articles/216660668-OPcache-overview). It’s worth noting that Dreamhost have replaced XCache with Opcache for their own premium VPS WordPress solution ‘DreamPress’.
- Disable XCache in the Dreamhost Domain Management control panel. You can not run Opcache and XCache at the same time as they will conflict.
- Enable the WordPress OPcache Dashboard plugin to test it is running correctly and monitor performance. There are plenty of Opcache GUIs out there that can be used instead or as well as.
- W3TC config
- Page Cache = Disk: Enhanced
- Minify = Minify mode: Manual / Minify Cache Method: Disk. For the Manual Minify settings you’ll need to experiment in order to get the best settings for your website. For my testing purposes I simply minified HTML (Enabled = Inline CSS minification, Inline JS minification)
- Opcode Cache = Opcode Cache: Opcode: Zend Opcache / Validate timestamps is automatically selected for me with the check box disabled
- Database Cache = Database Cache Method: Disk
- Browser Cache: Enable (Enabled = Set Last-Modified header, Set expires header, Set cache control header, Set entity tag (ETag), Set W3 Total Cache header, Enable HTTP (gzip) compression, Don’t set cookies for static files)
- Enable CloudFlare for your domain/sub-domain in your Dreamhost Domain Management control panel, making sure to also select Railgun option.